How to create a new CRF
Login to OpenClinica as Study Director and click on "Tasks". Choose from the list that appears "CRF's", under header "Administration" (fig. 1).
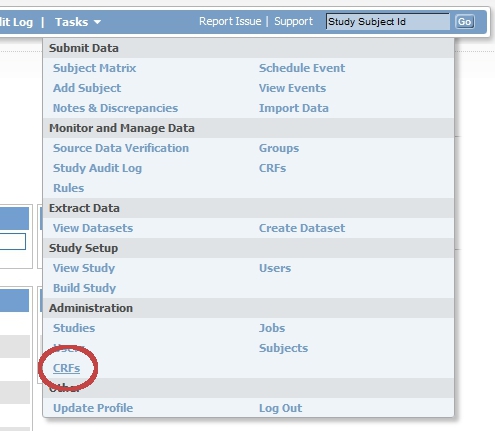
fig. 1: Task menu: CRF's
In the screen that now appears, "Administer Case Report Forms (CRF's)" click on "Blank CRF Template" (fig. 2).
![]()
fig. 2: Blank CRF template
Clicking this link starts a down-load of an Excel-sheet that can be used to define the elements of the CRF.
Save this Excel-sheet on a your computer and edit it, using Microsoft XL and save it under a new name.
In this section we will not elaborate on how you choose your section, your items and your validations.
But at this point it may be useful to know how OpenClinica handles names.
Every object in OpenClinica has a unique OpenClinica-ID or OID.
When you have edited the blank template to start a CRF for lets's say the intake of your study, rename your XL to 'Intake.xls'.
Furthermore, fill in this name in cell A2 of tab CRF (fig. 3).
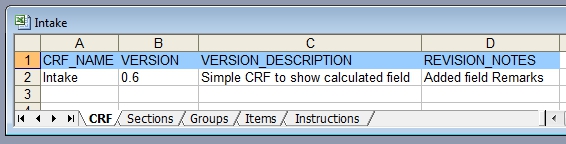
fig. 3: XL-template, tab 'CRF'
Now you can upload the XL (instructions below) and the CRF will appear in you list. The first four characters of the name of your XL-sheet will be used to construct the OID. In this case the OID for intake.xls will for example be "F_INTA_5348" and is found under column "VERSION_OID". The name you typed in cell A2 will appear the first column on the left, called "CRF Name".
Make sure you've saved your XL-sheet and switch back to OpenClinica. In the screen called "Administer Case Report Forms", click on "Create a new CRF" (fig. 4).

fig. 4: Upload a new CRF, 1
In the screen that opens, click on "Browse". Then browse to the XL-sheet and select it.
Then click on "Preview CRF Version"
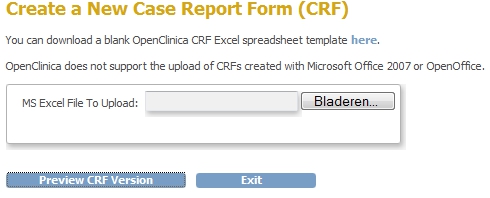
fig. 5: Upload a new CRF, 2
If errors were found they will be displayed in orange on the top of the page that appears. If no errors were found you can add your new CRF to your list of available CRF's.