using a regular expression to create a time field
Every now and then you may be in need of a time field. But, however flexible OpenClinica may be with dates and partial dates, there is no standard time-field-type. This can be solved by using a regular expression, that checks the format of a field.
the regular expression
We would like our time-field to accept input like 01:26 or 11:00 or 19:59 or 20:00 or 23:59 and to reject input like
88:99 or 4:6
Let's first concentrate on the input until 20:00. The regular expression would be
[0-1][0-9]:[0-5][0-9]
meaning more or less: start with 0 or 1 ([0-1]), followed by a number from 0 to 9, then the colon (:) followed by the minutes
as something in the range from 0 to 5 ([0-5]) followed by yet another number from 0 to 9.
Then the time from 20:00 till 23:59. The regular expression would be quite similar: 2[0-3]:[0-5][0-9] and that translates to:
start with a 2 (2), followed by anything in the range from 0 to 3 ([0-3]), then the semicolon and the minutes, as described before.
The last thing to do is combine these two with a pipe(|): ([0-1][0-9]:[0-5][0-9])|(2[0-3]:[0-5][0-9]) or nicer:
(([0-1][0-9])|(2[0-3])):[0-5][0-9]
testing the regular expression with regexpal
Testing a regular expression in OpenClinica is not an easy task: you have to put the regexp in your XL-sheet and upload it.
The syntax is validated, but not the result. In other words: your expression may be syntactically correct but accepts the wrong input or
rejects the right input. Checking this would require to add the CRF to a study event and then try different values.
Then modify the regexp, upload a new version etc, until the results are OK.
Fortunately there are tools to do this for you and one of these is
http://regexpal.com/. The interface consists of two Text-areas: one for your
regular expression and one for your input. As you can see in the screenshot below I copied the regular expression in the
first field and the values I would like to test, taken from the above text, in the second field (fig. 1)
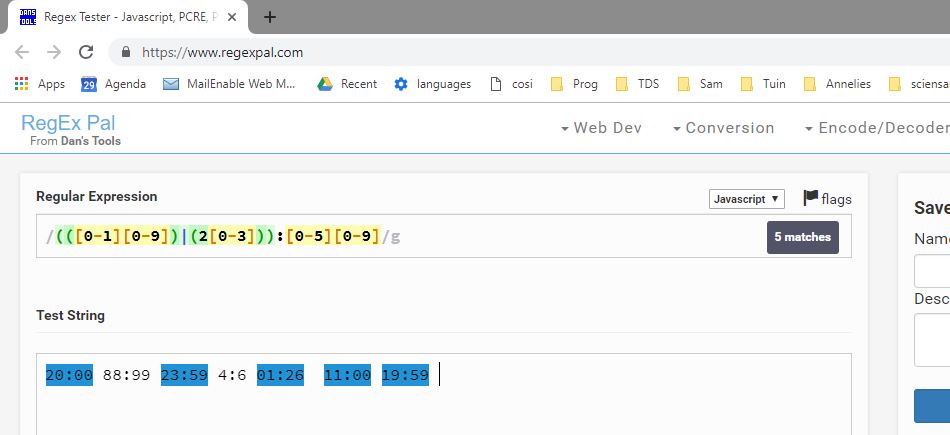
Fig. 1: regexpal testing
Every bit of the text-string that matches the regular expression is highlighted in blue and you see immediately that this expression is the right one for your job.
putting the regular expression in your XL-sheet
Now you can use the regexp in your XL-sheet. Add an item in the usual way and use for RESPONSE_TYPE (col. N) "text", for DATA_TYPE (col. T) "ST" for string. Your regexp goes in VALIDATION (col. V), preceeded with "regexp:" and enclosed with slashes. And in col. W goes your VALIDATION_ERROR_MESSAGE.

Fig. 2: putting the regexpal in the XL-sheet
And there you have it: your own time-field.
that's good, but what about comparing times?
Can you use this regular expression to compare times? For example you must record two time A and B and B must be later than A.
You want to create a rule for that, but when you try to upload it, you get the message
OCRERR_0001 : Logic Error, I_TDSDI_TIMETWO and I_TDSDI_TIMEONE cannot be used with the GREATER_THAN operator. This is because our Items are of DATA_TYPE
ST.
We want to be able to use the gt-operator in our expression, so we change the DATA_TYPE to REAL.
And furthermore we change our regular expression slightly:
instead of the : we use . as the
separator of hours and minutes. To use the . in a regular expression, it must have a \ before it, because the dot is
a special character for regular expressions.
This brings us to (([0-1][0-9])|(2[0-3]))\.[0-5][0-9]

Fig. 3: a different format, so we can compare
Now we're talking REALs, so we can use them in a comparison and our Rule will upload with congratulations and all:

Fig. 4: a snippet of the Rule
and calculations? can you do that?
Here you can find a new and updated page about how
to calculate the number of minutes between two time fields, even if those time-fields are
in a repeating-item-group.
The information below is correct, but we advise you to go to the other page.
Calculations is quite another story. Say you're taking two blood-samples and the time between those should be less than 2 hours
and 30 minutes. The trick with the point as separator won't bring us very far.
(This example is not random: if you only need to check the time difference in hours, you can use the REAL-format. As soon as you have minutes
you can not anymore.)
But we can create a workaround to solve this. For each time field we add another item where we can store the "minutes since midnight" value.
Hang on to your seats, because we will need some java-scripting for that.
We start with the CRF with four items: two time fields and two auxiliary fields.

Fig. 5: definition of the 4 fields
What's happening here? Well, we have two time-fields which are of type ST, TimeOne and TimeTwo. We will use these in a calculation with a script, so we name them TimeField1 and TimeField2. We're going to calculate the minutes since midnight and the results will be put in TimeOneMinutes and TimeTwoMinutes, which we will also give an id, Minutes1 and Minutes2, using the tag in the Right_Item_Text.
The script to calculate the minutes since midnight will be put in the Instructions part of the Section.

Fig. 6: the script
Now before we have a look at the script, let's have a look at the result:
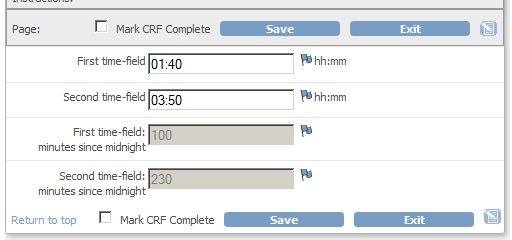
Fig. 7: the script in action
What we see here are the two time fields, 01:40 and 03:50 and the minutes since midnight for both: 100 and 230. With these fields we can make a Rule that raises a Discrepancy if the difference in minutes is more than 150 minutes (2 hours and 30 minutes).
If you're in a hurry to implement this technique, you can download the CRF here: the last part explains a bit more about the script.
a closer look at the script
Here is the script:
<script src="includes/jmesa/jquery.min.js"></script>
<script lang="Javascript">
$.noConflict();
jQuery(document).ready(function($){
	//find out who's who
	var fieldTimeField1 = $("#TimeField1").parent().parent().find("input");
	var fieldMinutes1 = $("#Minutes1").parent().parent().find("input");
	var fieldTimeField2 = $("#TimeField2").parent().parent().find("input");
	var fieldMinutes2 = $("#Minutes2").parent().parent().find("input");

	function calculateMinutes(fieldTimeField, fieldMinutes){
		// retrieve values
		var TimeAsText = fieldTimeField.val();
		var currMinutes = fieldMinutes.val();
		// check whether both fields are filled
		if(TimeAsText!=""){
			// split and determine hours and minutes
			var splitString = TimeAsText.split(":");
			var hours = splitString[0];
			var minutes = splitString[1];
			var calcMinutes = (60*hours)+(1*minutes);
			if (calcMinutes != fieldMinutes.val()){
				fieldMinutes.val(calcMinutes);
				fieldMinutes.change();
			}
		}
	}
	// fire when anything is entered
	fieldTimeField1.keyup(function(){
		calculateMinutes(fieldTimeField1, fieldMinutes1);
	});
	fieldTimeField2.keyup(function(){
		calculateMinutes(fieldTimeField2, fieldMinutes2);
	});
});
</script>
Although it's lengthy, it's easy to follow. First fieldTimeField1 and fieldMinutes1 are identified.
Then the same is done for fieldTimeField2 and fieldMinutes2.
When anything is typed in one of the fields , fieldTimeField1.keyup(function() and fieldTimeField2.keyup(function(), the
calculations are made by calling function calculateMinutes().
The calculation is done in function calculateMinutes(fieldTimeField, fieldMinutes): fieldTimeField is used to calculate with and the result is written to fieldMinutes. To do this the fieldTimeField is split at the : in an hours-part and a minutes-part and these are added: calcMinutes = (60*hours)+(1*minutes).
Other how-to-pages can be found here.
this page was last reviewed April 2019