warnings and messages
On some occasions you may want to display to display extra text on your CRF, based on the input of the user. For example when a lab value is out of the normal range, you want the user to be aware of this, without creating a Discrepancy. Or when a user entered that co-medication was used, you may want to display a message that the corresponding form must be entered.
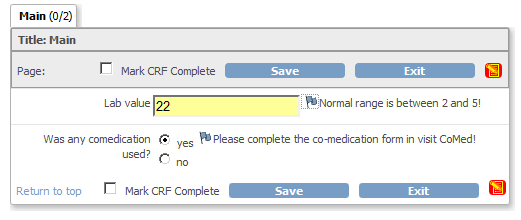
fig. 1: example of a CRF with two extra warnings
This can be done with the help of some javascript. (Again!)
You can download an example-CRF here.
warning based on a numeric input
Let's start with the range check of the first item. We get the warning by inserting the following text in the RIGHT_ITEM_TEXT.
<div id="MessageDiv"> </div>
<script src="includes/jmesa/jquery.min.js">// for OC versions before 3.1.4, use jquery-1.3.2.min.js !</script>
<script>
$.noConflict();
jQuery(document).ready(function($) {
var fieldToCheck = $("#MessageDiv").parent().parent().find("input");
function setMessage(){
var valueToCheck = fieldToCheck.val();
if (valueToCheck && (valueToCheck > 5 || valueToCheck < 2)){
$("#MessageDiv").html("Normal range is between 2 and 5!");
}
else {
$("#MessageDiv").html("");
};
};
fieldToCheck.keyup(function(){
setMessage();
});
setMessage();
})
</script>
In the first line we define a block or div that will hold our message and we call it MessageDiv. We get to the CRF-item we want to check by going to the parent-of-the-parent of this div and then finding the input and we give this the name fieldToCheck. Every time something is entered in this CRF-item we want to call a function setMessage and this is done by using the keyup-method: fieldToCheck.keyup(function(){setMessage();})
In the function setMessage() we first get the value of the CRF-item, var valueToCheck = fieldToCheck.val(); and then we check if it exists at all and if so, if it is greater than 5 or less then 2. And if this is so, then we put a text in our div.
can we do this with radio buttons?
Radio buttons are slightly different, in that they come in pairs. In the example at the top of this page we see a group with the options yes and no, with corresponding values (1 and 0, that are not visible). Again we must put some script in the RIGHT_ITEM_TEXT.
<div id="ComedMessageDiv"> </div>
<script src="includes/jmesa/jquery.min.js">// for OC versions before 3.1.4, use jquery-1.3.2.min.js !</script>
<script>
$.noConflict();
jQuery(document).ready(function($) {
var radiosToCheck = $("#ComedMessageDiv").parent().parent().find("input");
function setMessageCoMed(){
for (var i = 0; i < radiosToCheck.length; i++) {
if (radiosToCheck[i].checked) {
var valueToCheck = radiosToCheck[i].value;
}
}
if (valueToCheck && (valueToCheck == 1)){
$("#ComedMessageDiv").html("Please complete the co-medication form in visit CoMed!");
}
else {
$("#ComedMessageDiv").html("");
};
};
radiosToCheck.change(function(){
setMessageCoMed();
});
setMessageCoMed();
})
</script>
The big difference is the part where we want to get the value of a group of radio-buttons. For this we must loop through all
the buttons that are part of the group and we do this with for (var i = 0; i < radiosToCheck.length; i++).
And the one that is checked holds the value: var valueToCheck = radiosToCheck[i].value;.
Notice that we now use the change-method: the function is called whenever the radio-group changes.
Other how-to-pages can be found here.