setting up web-services
With version 3.1 came a brand-new version of the web-services of OpenClinica. Before the webservices were in the same app
as the web-interface, but starting with this release, a separate app is used. And it is very easy to install.
First of all you must check if you have in your Tomcat settings the setting "-XX:PermSize=128m". Take this as a startingpoint
and and add more if your logs tell you.
The next step is downloading the war with the web-service. Take care to choose exactly the same version as your web-interface. Unzip the file OpenClinica-ws.war and then open a browser and choose [yourserver]:8080/manager/html as URL. This is a bit different from the installation instructions, but rest assured: they work as well. Scroll down the page to the box labeled WAR file to deploy and browse to the location of the war-file and click the button Deploy.

fig. 1: Deploying the war using Tomcat's manager-application
After some time, let's say a couple of minutes, Tomcat will have deployed the war and tried to start it, but this was not successful,
so column Running will be set to false. Of course this has to do with the datainfo.properties, located under
/tomcat/webapps/OpenClinica-ws/WEB-INF/classes. To repair, take the datainfo.properties of OpenClinica and copy it to the
location of the default datainfo.properties of the OpenClinica-ws. Open it in your favorite editor, such as Notepad++ and
and then change two lines:
- the name of the database, that is: if you did not change it from to a hard-coded name (which is what I prefer)
- the sysURL under number 8: change OpenClinica into OpenClinca-ws
Hold on, while you still have Notepad++ open, open /tomcat/webapps/OpenClinica-ws/WEB-INF/web.xml. Change the elements display-name and description into something slightly more descriptive.
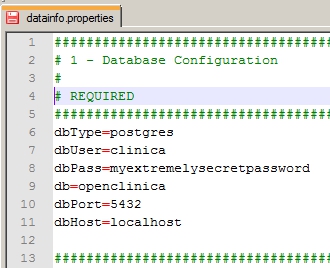
fig. 2: Change database-name
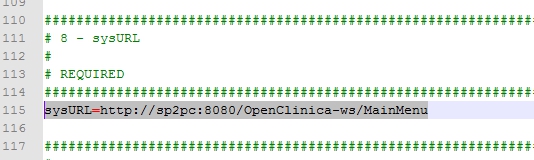
fig. 3: Change sysURL
Hold on, while you still have Notepad++ open, open /tomcat/webapps/OpenClinica-ws/WEB-INF/web.xml. Change the elements display-name and description into something slightly more descriptive.
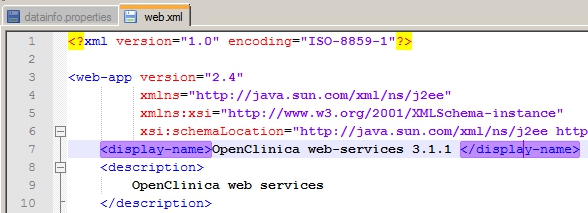
fig. 4: Changing web.xml
Now if we click the Start link of the OpenClinica-ws-app, it should be up and running.

fig. 5: web interface and web-services running
We can check this by typing in a URL of one of the web-services, for example /ws/studySubject/v1/studySubjectWsdl.wsdl and then we see the output in our browser. Not extremely useful yet, but it is proof we've accomplished something. On to the next step.
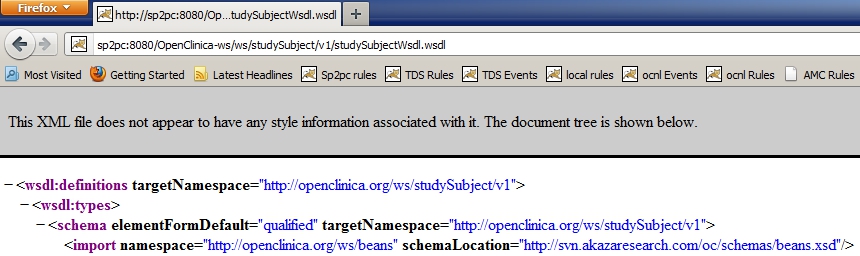
fig. 6: testing one of the web-services
enter soapUI
To test web-services soapUI is a great tool.
Once you've installed it you start by making a new workspace, for example OC 3.1.1.
For this example we will use the study-webservice, located under
/OpenClinica-ws/ws/study/v1/studyWsdl.wsdl. Make sure this is the right address by typing it in a browser and seeing the output. Copy the address.
Switch to soapUI and create a new project, by right-clicking on the workspace and choosing New soapUI project. In the screen that appears,
fill in for Project name Study webservice and paste the URL from your browser into Initial WSDL/WADL.

fig. 7: creating a new project
We will use the second Request, called listAll. Double-click this and a request will be generated. Click on the select that says /ws/study/v1 and choose [edit current..].
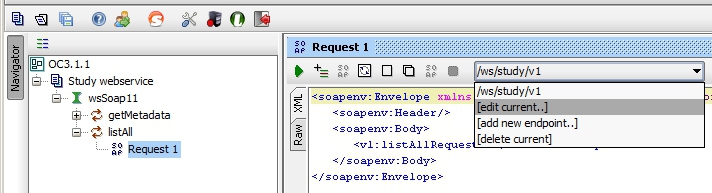
fig. 8: creating a new Request
Again, paste the URL of the web-service from your browser into the dialog asking for the end-point.
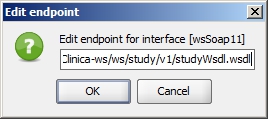
fig. 9: Endpoint
We can almost submit our request, but first we must do two things:
- allowing one of the OpenClinica-users to access the webservice
- supplying the webservice with username and password
back to OpenClinica
It's one of the fine features of OpenClinica's webservices that you can rely on the user-rights as defined in the application.
This may seem trivial, but it is surely not. It means that you do not have to worry about unauthorised
users accessing your data. In fact you must specifically authorise them to make use of webservices.
This is done in the web-interface, the "normal" OpenClinica, under menu-option Users.
We will start with allowing user root access to the webservices. This is done by checking the box labeled
Authorize SOAP web services in this account and then click Next and Confirm.

fig. 10: authorizing root
and over to you, soapUI
So, can we now make the request? No, we must start the request with handing over our credentials, so to speak.
This is done in the request header, which by default is set to <soapenv:Header/>.
That's not enough and we see that when we submit the request by clicking the Start-icon, the green arrow/triangle in the top-left of the
soapUI-screen. The service responds with a XWSSecurityException.
We can find the right format at the OpenClinica-docs-site, at
https://docs.openclinica.com/3.1/technical-documents/openclinica-web-services-guide/study-web-service#content-title-3004. Just
copy the bit between <soapenv:Header> and </soapenv:Header>
and paste it in soapUI, so that it replaces <soapenv:Header/>.
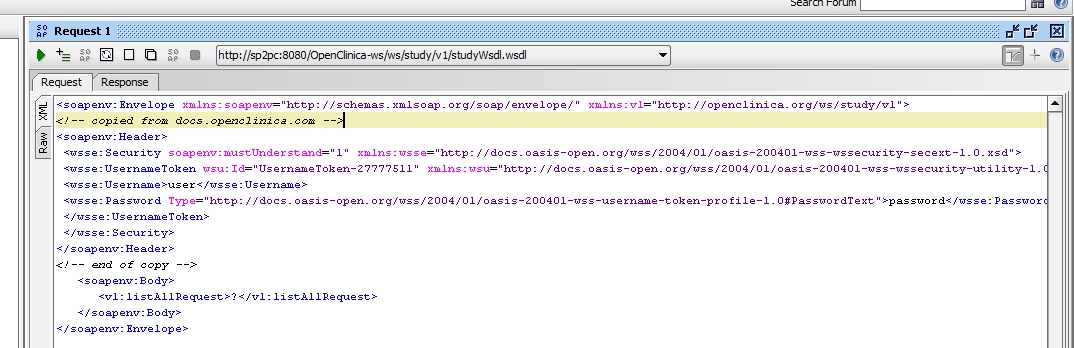
fig. 11: pasting the header
Hold on, there are two more steps to take. First we replace the word user in the header with root,
and then we replace password with, no, not with the actual password. We must use the password
converted into a hash with the SHA1-algoritm. There are sites and utils for this, for example
http://www.tech-faq.com/sha-1-generator.
Copy the generated string and paste it in the header.
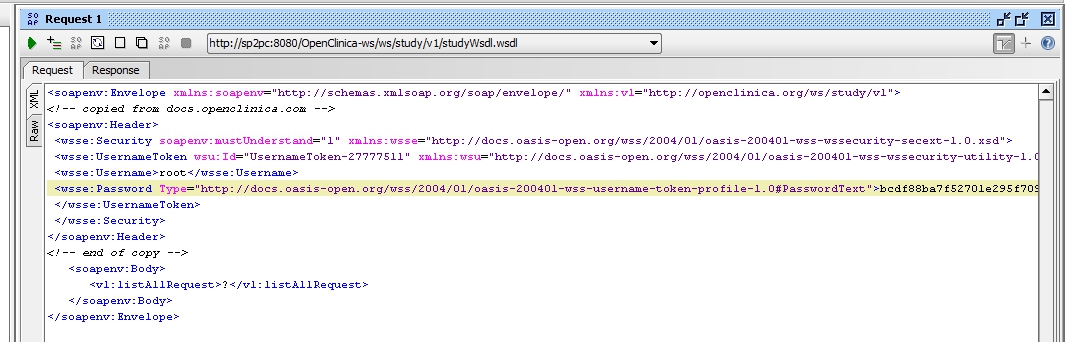
fig. 12: the request, ready to be sent
And finally you can push the button, the green icon in the top-left corner, and your result will be a list of all available studies and sites.
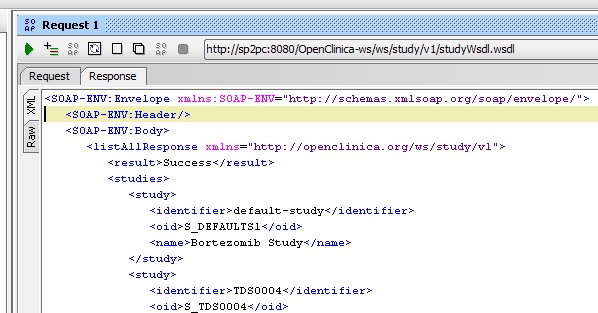
fig. 13: the result
Other how-to-pages can be found here.
this page was last reviewed November 2013